Even though it’s not socially acceptable for adults to go trick-or-treating, there’s no reason you can’t enjoy a few sweet treats on October 31st.
But instead of stocking up on fun size candy, put your kitchen to good use— especially those of you with full kitchens, like the residents at The Lofts in Morgantown,WV and 100 Midtown in Atlanta.
Whip up these tasty and terrific-looking Halloween-themed desserts, and feel like a kid again.
Dracula’s Dentures (above)
You Will Need:
1 package (18.25 ounces) refrigerated chocolate chip cookie dough or your favorite cookie recipe
1/2 cup prepared vanilla frosting, tinted red
1 3/4 cups miniature marshmallows
48 slivered almonds
Directions:
1. Prepare cookies as directed on package or according to your favorite recipe. Cool on baking sheets for 2 minutes; remove to wire rack to cool completely. Cut each cookie in half for a total of 48 halves.
2. Frost the bottoms of all cookie halves with frosting. Place 6 marshmallow teeth around curved perimeter of 24 halves. For additional support, an additional marshmallow can be placed behind the teeth. Top with remaining 24 halves. Insert two almond slivers in between teeth for fangs. If fangs do not adhere, dip tips into frosting.
Graveyard Chocolate Cheesecake Dip
You Will Need: 
1 package cream (8 ounce) cheese, at room temperature
1/4 cup (1/2 stick) unsalted butter, at room temperature
5 tablespoons cocoa powder
2 tablespoons Imperial Sugar Light Brown Sugar
1/2 teaspoon vanilla extract
1/4 teaspoon kosher salt
2 tablespoons milk
2 cups, plus 2 tablespoons sifted Imperial Sugar Confectioners Powdered Sugar
To Decorate and Serve
Crushed chocolate cream sandwich cookies, enough to cover the dip (about 10)
Vanilla sandwich cookies, such as Milanos®
Black decorating icing
Candy corn and pumpkins
Graham crackers, apple slices, and/or pretzels, for serving
Directions:
1. In a medium bowl, beat together cream cheese and butter until smooth. Sift in cocoa powder, then add brown sugar, vanilla extract, salt and milk. Beat on low speed until the cocoa powder is incorporated, then increase speed to high, until very well combined. Sift in powdered sugar, 1/2 cup at a time, beating slowly after each addition to incorporate. Increase speed to high and beat until smooth and light, about 3 minutes. Transfer dip to a serving dish and smooth top with a spatula.
2. Spread crushed chocolate cookies over the top of dip to form “dirt.” With decorating icing, write “RIP” on vanilla wafer cookies, then stand upright in dip to form “tombstones.” Scatter candy corn and candy pumpkins over top to decorate. Serve with graham crackers, sliced apples and/or pretzels as desired.
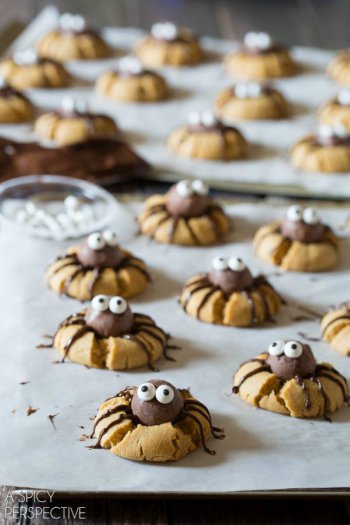
Chocolate Peanut Butter Spider Cookies
You Will Need: 
1/2 cup unsalted butter, softened
3/4 cup smooth peanut butter
1/3 cup brown sugar
1/2 cup granulated sugar
1 teaspoon vanilla extract
1 large egg
1 1/4 cup all purpose flour
3/4 teaspoon baking powder
1/4 teaspoon baking soda
1 teaspoon salt
24 round chocolate truffles
3/4 cup semisweet chocolate chips
48 candy eyes
Directions:
1. Preheat the oven to 350 degrees F. Line two baking sheets with parchment paper and set aside.
2. Place the softened butter and peanut butter in the mixer and beat until fluffy. Then add both sugar and beat again until fluffy. Scrape the bowl and beat in the vanilla and egg.
3. In a separate bowl mix the flour, baking powder, baking soda and salt together. Turn the mixer on low to slowly incorporate the flour mixture.
4. Roll the cookie dough into 24 – 1 1/2 tablespoon balls and spread 12 out on each cookie sheet. Bake for 10 minutes. Remove from the oven. Quickly use a pestle to press a cavity in the middle of each cookie. Then place back in the oven and bake another 6-10 minutes, until golden.
5. Meanwhile, unwrap all the chocolate truffles. Once the cookies are out of the oven, cool until almost at room temperature (but not very warm) and place a truffle in the cavity of each cookie. If the cookies are too warm, the truffle will melt. If the cookies are cool, the truffle won’t stick. (You can also wait until the cookies are completely cool, then glue the truffles in with chocolate to be safe.)
6. Melt the chocolate chips in the microwave in 30 second increments, stirring in between, until melted and smooth. Scoop the melted chocolate in a zip bag. Close the bag and snip off a small portion of one corner to create a hole. Pipe 8 legs on each cookie, starting with the truffle body down.
Frankenstein Marshmallow Pops
You Will Need: 
green candy melts
marshmallows
small pretzel rods
semisweet chocolate chips
candy eyeballs
edible red and black markers
To Decorate and Serve
toothpicks
lollipop sticks or colorful straws
Directions:
1. Melt the green candy melts in a microwave or double boiler according to package directions until they are fully melted.
2. Push the lollipop sticks into the marshmallows then dip the marshmallows into the melted candy, turning to cover them completely. Stand the marshmallows upright in a glass filled with uncooked rice or oatmeal and place the glass in the fridge until the chocolate has cooled and hardened slightly, about 5 minutes.
3. Melt the chocolate chips in a microwave or double boiler until smooth. Dip the tops of each of the coated marshmallows in the chocolate to form the hair, and using a toothpick, drag the chocolate down toward the base of the marshmallow to form spikes of hair. Return the marshmallows to the fridge until the chocolate has hardened, about 5 minutes.
4. Break the ends off of the pretzel rods to form the small (about 1/8-inch) “bolts” for Frankenstein’s neck. Carefully push one piece of pretzel into each side of the marshmallow about 1/3 of the way from the bottom.
5. Using a toothpick and the remaining melted chocolate, dab two small dots of chocolate onto each marshmallow and press on the candy eyeballs.
6. Using the black edible marker, draw on a mouth, and then using the red edible marker, draw on a laceration on Frankenstein’s forehead. Enjoy the marshmallow pops immediately or store them in an air-tight contained in the fridge until ready to serve.